Weddings are incredibly personal and incredibly expensive. You can save a little cash and make your wedding one of a kind by whipping together some of these DIYs. Not only will you end up with a gorgeous wedding but you'll also have the pride of knowing you did it all yourself!
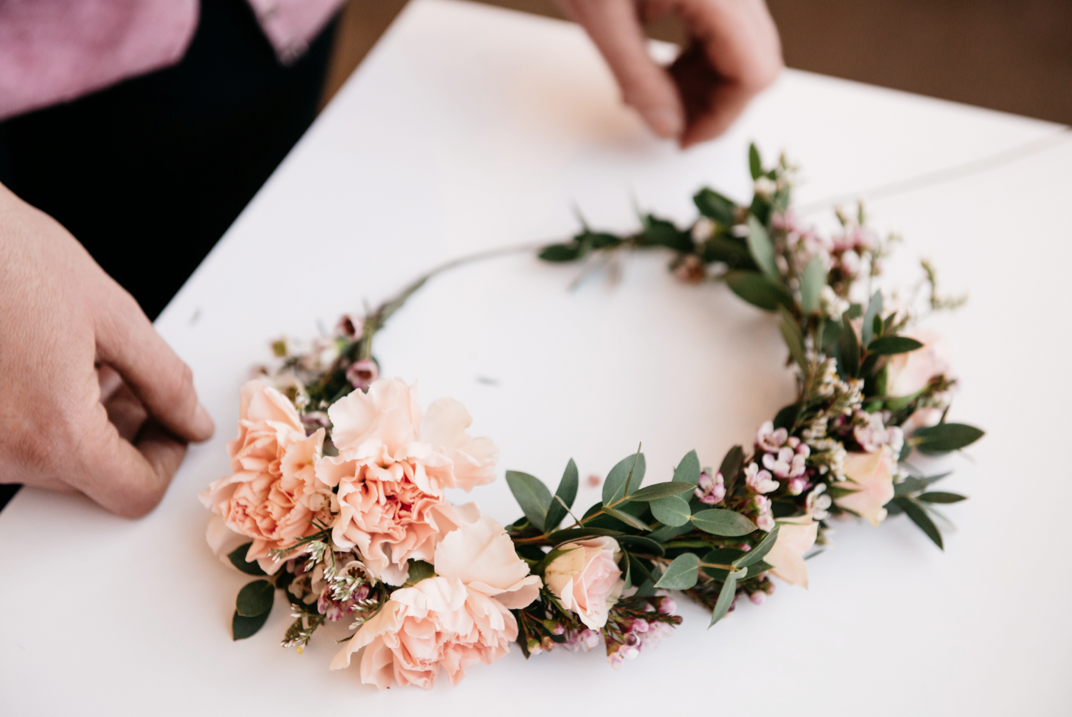
 Floral Crowns are Very Trendy right now and you they're surprisingly easy to make! Head over to The Lodge to learn how to make your very own.
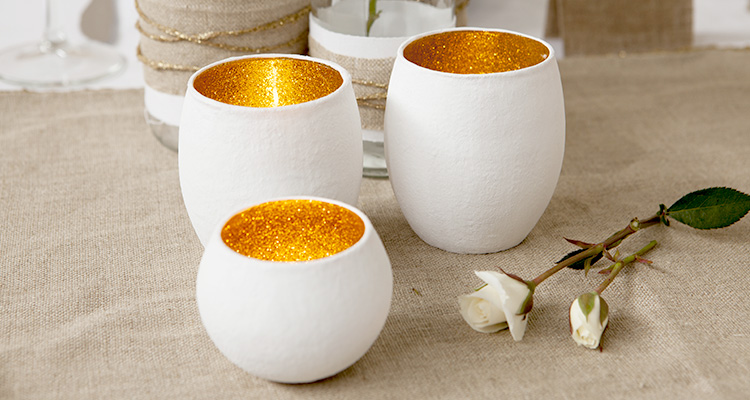
 Make these in any colors you want to add instant drama to centerpieces and tables. go to Tara Dennis to get this super easy tutorial.
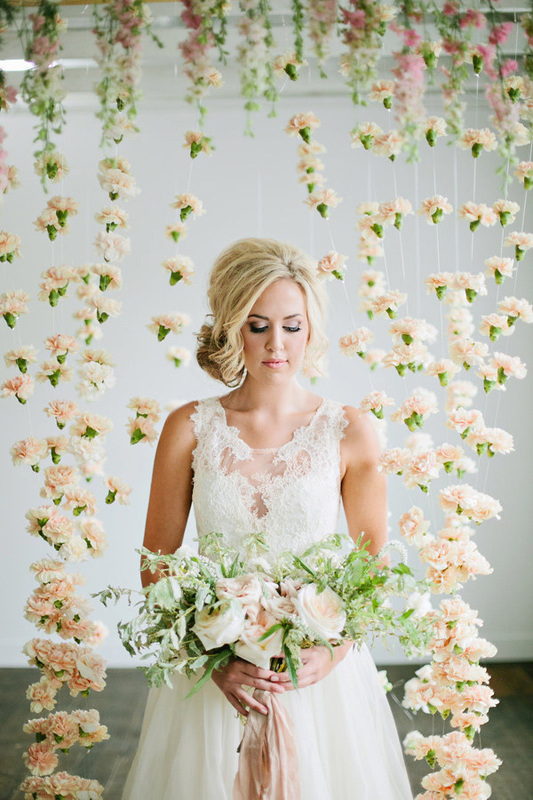
 A Practical Wedding Has the Instructions for this pretty and etherial backdrop perfect for hanging behind the ceremony or bride's table. You can also hang fabric behind it for more opaque coverage.
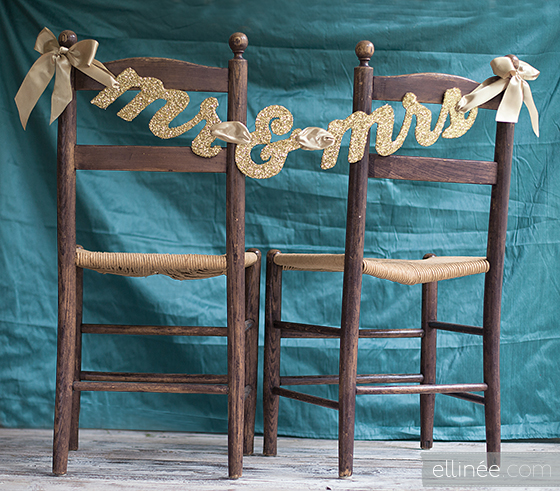
 This sparkly banner would look great behind the bride and groom's chairs or across the front of the Bride's Table. Head to The Elli Blog to learn how to make yours
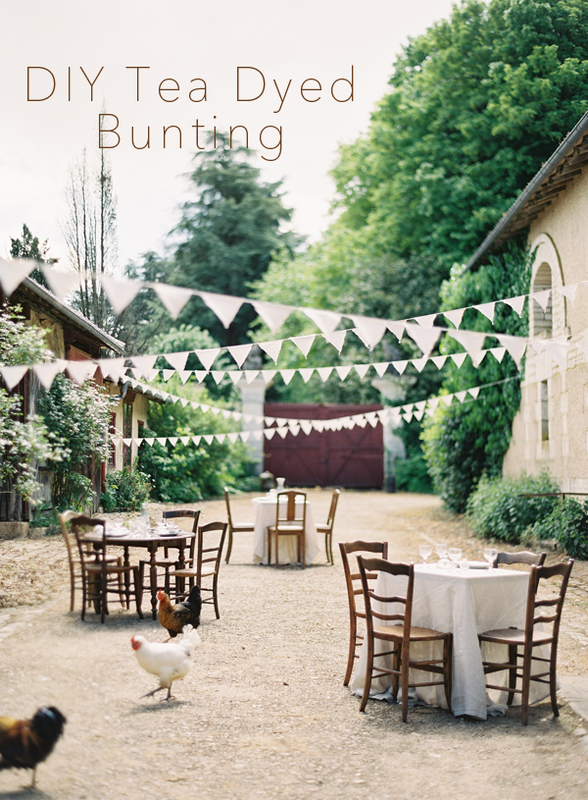
 For a Vintage look go to Once Wed for this beautiful bunting tutorial. You can also choose colorful fabric and skip the dyeing for a brighter look.
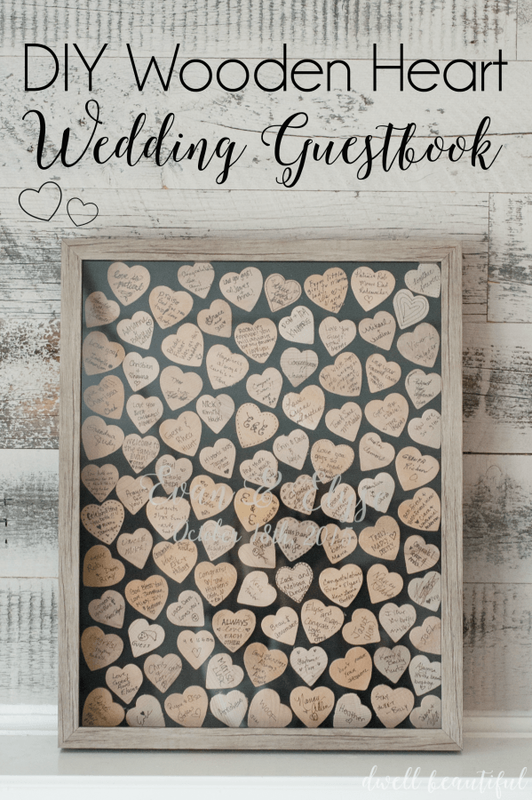
 Let your guests create a new piece of art for your home and wish you well in your marriage at the same time. Dwell Beautiful can teach you how.
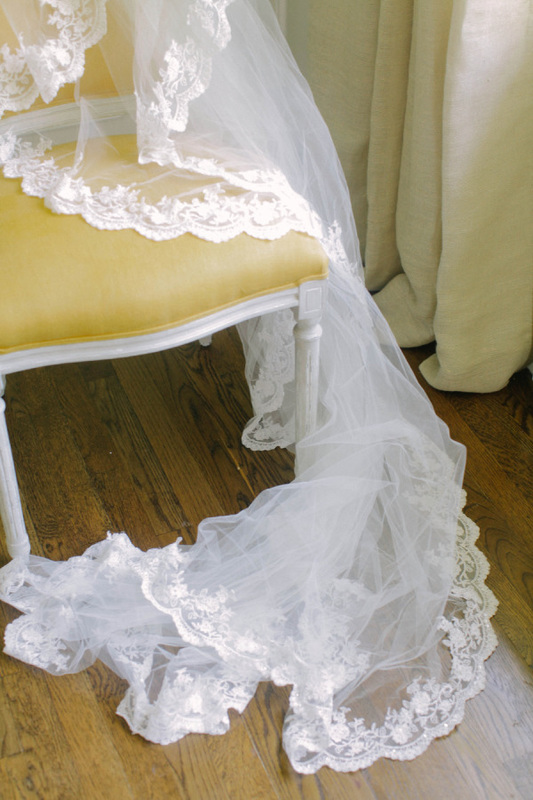
 Veils can cost hundreds of dollars, especially ones with lace details. But even if you don't have much sewing experience Style Me Pretty can show you how to make one yourself that will wow your guests.
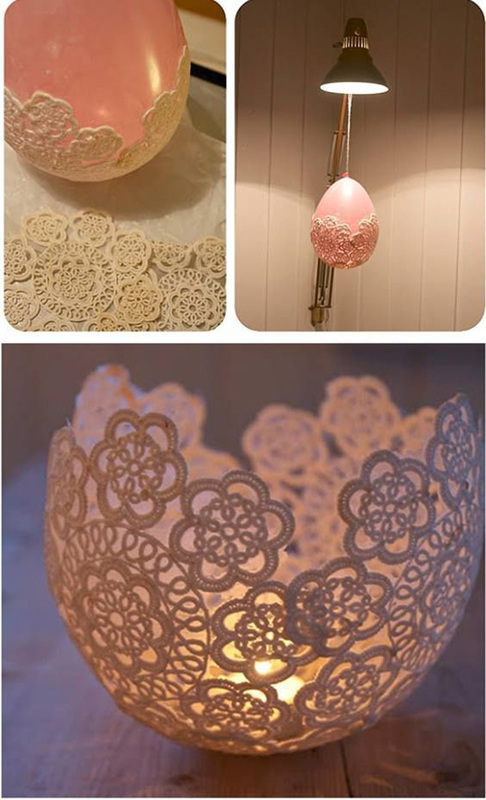
 The glittery Votives weren't your thing? maybe these lace votives from Oh Best Day Ever will fit your theme better. They're super easy and would look great on any table Rice is old fashioned. Instead, make the exit from your ceremony in a shower of confetti and get some seriously awesome photos. Wedding Bells has the tutorial
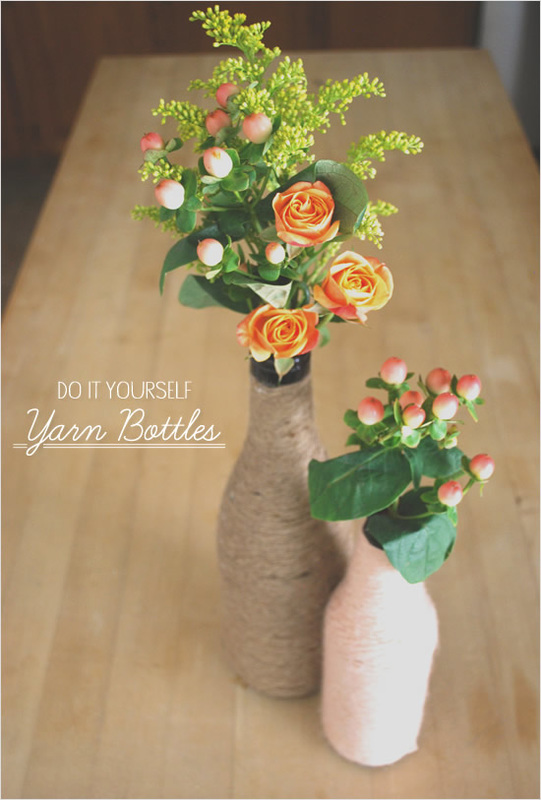
 Just pop some flowers in and your centerpiece is done! The Wedding Chicks has pretty much the easiest tutorial ever with this one. Plus you can make them in any colors!
If you've spent money to hire a professional photographer to photograph your family or wedding don't just post the photos on Facebook and be done with it. Do those photos the justice they deserve and display them. Now don't get me wrong, I love Facebook! When I lived 12 hours away from family it was how I shared my life, and photos of my children, with the people I care about. But, how often do you see your photos once you've posted them? After the initial liking and commenting you probably rarely if ever look at them again. I say we need to get back to putting these special images on our walls and in our homes again. Where we can see them and be moved by them everyday. If you've created a collection with me you'll already be receiving at least one art piece whether that be a Gallery Wrap, Wall Print, or Album so that's a good start. When most people start buying prints they usually think, ok I'll get some 5x7's maybe some 8x10's of the ones I really like. But trust me when I say that an 8x10 all alone on the wall is going to look strange. Or don't trust me, here's an example. Above is the same bedroom with an 8x10 above the bed and a 24x36 (the largest size we offer) I think its pretty clear which one makes the room look more finished. But one big print isn't for everyone and its definitely not all you can do with your photos. here are two more easy examples of visually interesting ways to display your photos as art. But, if you've spent any time on pinterest lately (I know I have) you've come across the wall collage. Here's an example of one in my mom's living room and one I whipped up. The collage is my favorite way to display photos and I encourage everyone to have one in their home, but I know it can be intimidating if you've never even displayed art pieces in your home to jump to this. But trust me, its easier than it looks. First, gather the photos and other pieces of art you want to display. Try to have a variety of sizes. You can have everything in matching frames or for a more eclectic look go for frames of different types and colors. Lay your photos in their frames and anything else you want to hang on the floor on top of some butcher paper. You can move things around and see how they look without putting holes in your walls. The collage looks the most cohesive when everything is around two inches apart. Too much space and things start to look like they aren't meant to be together. Once you've found a layout you like use a pencil to outline all of your pieces on the butcher paper. Then you can pin the entire piece of paper to the wall and you have a nice template for where to put your nails. Once the nails are in you can just pull the paper down and hang your photos. You can also think outside the box when it comes to the location of your collage. Hang one in a corner! or maybe don't hang them at all. Put them on shelves! If you bought an album as your art piece the same principle applies, put those things where you and visitors to your home can see them! Of course, that involves a lot less work than hanging canvases and wall prints. Simply put it on your coffee table, allow yourself and visitors to flip through it whenever they want. All albums sold by Karah Couch Photography are high quality and archival, they can stand up to use so don't be afraid to use them. And one last but extremely important reason to display your photos, the dirty little secret of technology, digital files are not forever! You can lose them, more easily than you think. First there's corruption, every time you transfer a file from one thing to the other (say from your computer to a thumb drive) it can be corrupted and become unusable. Then there's hard drive crashes, all your photos are safely stored on your computer and then poof they're gone. Then there's just the inevitable march of time. You may have your photos perfectly intact on a CD or thumb drive but find yourself without any machine that can open it. Its like if you had a movie library stocked full of betamax, it would't do you much good. So please, print your photos and display them so you can see them forever and maybe even pass them down to your children one day.
We all want to have the best photos possible of ourselves and our families and the first step to that is hiring a great photographer. After that there are some things you can do to make sure you get exactly what you're looking for.
Location
The number one question most people have is "where will we take our photos?" Of course, some clients book an appointment knowing exactly the spot they want their photos taken. If that's you, that's great! If not there are a few things to think about.
Urban, Natural, or Studio A Natural area is something like a field, beach, or forest area. Natural backgrounds are great for capturing interaction between families. They're simple and draw focus to the person or people in the image. The Golden hour is the best time to take photos in a natural setting
Urban areas are alleys and cool buildings. They add texture and dimension to your photos and you tend to get more variety in your background. Urban areas are great for families and senior portraits, not so much for babies.
A portable studio can be set up in your home with a white or black background. Studio shoots can be done anytime of day since they are lit artificially. I do not recommend studio sessions for family portraits since they look a bit dated but they can be great for babies and are an absolute must for newborns
Once you've decided What type of setting you want you may get some ideas about where you want your session to be. If you don't, don't worry. I have a pretty extensive list of great places to shoot photos so you can let me know what type of setting you want and I can choose the perfect location near you.
What to Wear
Few elements in planning your photography session are agonized over more than what to wear. My number one piece of advice is Coordinate, Don't match. You don't have to wear the same outfit. For many years that was the portrait photography style, everyone wears matching outfits usually black or white. Since then things have loosened up. There are no hard rules about what you must wear but there are a few guidelines to follow. Make sure the type of clothes everyone is wearing goes together. If some of your are dressy, you should all be dressy. If some are casual, you should all be casual. As for colors the main thing is not to clash with each other. Try laying out all the outfits next to each other to see how they look together. Some helpful tips are to avoid overly bright colors a lime green or hot pink is going to overwhelm you in a photo. You want people looking at you, not your clothes. If you're the kind of person who has trouble deciding if colors go well together or want to be absolutely sure they will look good, heres a little trick. The good old color wheel.
Colors across from each other look good together. Choose two colors from the wheel and a neutral like brown, black, white, or tan. Now, not everyone should wear all of these colors. Try having each person wear some combination of the colors so that when the group is all together we get them all. Or if you're really into choosing your colors try visiting this site for a really fun way to get color ideas that all look great together.
Kids
We want to capture your child's personality not just big cheesy smiles. So don't worry if it takes a little while for them to warm up. I recommend making sure they eat right before your sessions so they don't get hungry in the middle of it. Bring an extra outfit and a favorite toy. You never know what could happen during a shoot that could mess up that perfect outfit you picked out. A child could trip and get dirty or if we're talking about babies we could have a spit up or blowout situation so make sure you have a backup. For young Children a photo shoot can be a bit scary at first. Some stranger is pointing this big machine at them. So bring along a favorite toy for comfort, we may not need it but it can help.
During the Session
The Length of your session will be determined by which package you choose but its important to not try to rush through it. I want to make sure that your photos are the best they can be which means a lot of attention to detail. Sometimes I also like to hang back a bit sometimes and let you interact with each other or let children play. Sometimes the best photos are the candid ones.
After Your Session
Okay! so we took your photos and had lots of fun, now what? It will take around two weeks for your photos to be ready to be viewed. What am I doing during these two weeks? Well, I may have other photo sessions but I'll also be editing and retouching your photos. While I don't do extensive retouching generally, there are some things that need to be done to every photo to make them look their best. A bit or color correction and smoothing can make a world of difference so it really is worth the wait.
Buying Your Photos
Choosing your photos is not easy. Not only can it be difficult to choose between images, deciding on products can be even harder. I come to your home and sit down with you to help you sort all that out for no extra fee. We'll go through your photos together and talk about how you hope to display them, where you want to put them, if you like flat prints or canvas. If you'd like an album and if so what kind. You can even invite other people over to help or buy some for themselves (grandparents) While it may seem like a pain to set up another appointment trust me when I say that in my experience, clients are much happier when they've had a little help.
So now that you're prepared, Book an Appointment today
Of course there are some times when hiring a professional is really the best way to go, big milestones like a newborn shoot, birthdays, and what have you. But unless you're Beyonce you can't have a photographer with you every day, sometimes you're going to have to take them yourself. So, no matter what your skill level is, follow this list and you'll be sure to get great photos of your kids at home.
1. Get Outside if you can!! you really can't beat good old natural light so get out there and take some shots. Its best to take photos outdoors during whats called The Golden Hour (one hour after sunrise and one before sunset) but other times of day are great too just try to be out of direct sunlight in the shade. 2. Step away from the FLASH! Whether you're in low light inside or dark shade outside you're camera may want to use flash, do not do it! flash is ugly, it flattens the image and blows out detail. Take the photo below.
Doesn't look so good huh. She's overly bright, the background is overly dark, overall its just kinda bleh. Of course, there are times when flash is necessary and things you can do to make it look good like bounce it off of a reflective surface but if its the pop-up flash on your camera its probably going to look bad.
3. Shoot near a window! So you can't go out side, no problem, shoot near a window you'll still get the benefit of natural light only indoors. set up with the Window in front of or beside your little one for good lighting on their face or with the window behind them for a nice silhouette effect
4. Know your Camera!
But won't my photos be too dark without the flash? And by the way, how do I turn the flash off anyway? No and I'm not sure, all cameras are different. So break out the manual or look up tutorials online and learn how to use your camera, how to change your settings, what all the abbreviations on it mean, how to turn your flash off, all that. You won't regret learning and you'll have some basic knowledge so the rest of this will be easy peasy. 5. Set your White Balance! Your white balance is what tells your camera what color the light is where you're taking photos. Sure there's an auto setting on it but my experience is, your photos look better if you tell it where you are. Most cameras have AWB (auto white balance), Daylight (Bright Sunlight), Shade (pretty self explanatory), Cloudy, Flash (you're using a flash), White Fluorescent light, and Tungsten Bulb (a normal light bulb) Choose the one that matches the conditions you're in
6. ISO!
Set a low-ish ISO. The ISO is basically a standard of how sensitive your camera is going to be to light. The Higher the ISO the more sensitive it is to light meaning the photos will be brighter in lower light. That sounds great except that the higher the ISO the more noise. noise is how grainy an image will appear. So, the best course of action is to set the lowest ISO you can while still having enough light. How will you know how low you can go? read on! From this point on I'm going to separate readers into two sections, Beginner and Experienced. If you're a beginner keep reading, if you're more advanced skip ahead to number 8. 7. Set your Camera to Aperture Priority Mode when you take a photo with your camera a little diaphragm inside your lens opens and lets light in. Aperture or F-stop refers to how wide this diaphragm opens. Here's where it gets tricky; the lower the f-stop number, the wider the diaphragm is. Here's an illustration
When the aperture is open wide your camera is able to take in the most light, it also shortens the depth of field meaning how much of the photo is in focus. When you're taking photos of people you'll usually only want them to be in focus and not the whole room so a short depth of field is a good thing. So, in aperture mode (usually represented by an A on the wheel on top of your camera) set your f-stop to somewhere around 2.8 or as low as your lens will go but not lower since it can be hard to get everything you want in focus any lower. Then, set your ISO to 200 if you're inside. Your camera will automatically set the shutter speed to go with your other settings. If the shutter speed in any lower than 1/125 move your ISO higher. Keep going until you reach an acceptable shutter speed. That's all! Snap away
Experienced Shooters: 8. Set your Camera to Manual! In manual mode you'll have complete control over everything in your photo, it can be a little overwhelming at first but its the best way to get awesome pictures. 9. Set your aperture and shutter speed! if you're not sure what an aperture is, read number 7 and come back. Shutter speed is how long your shutter or diaphragm stays open. a shorter shutter speed like 1/250 freezes the action and lets in less light, a longer shutter speed like 1/15 lets in more light and blurs the action. you'll want to find a balance between the two and your ISO and get exactly what you're looking for. Try a large aperture and short shutter speed for portraits like f 2.8 and 1/200. Depending on your lighting situation you may have to play around with that. if you have your aperture as wide as it goes and your shutter speed still has to be too low try raising your ISO. You can see whether your settings are right without taking a photo. Either on the back of your camera or when you look through the viewfinder you'll see something like this
That little triangle will point to where your settings will put your photos on this graph. whether you're over exposed (too bright), under exposed (too dark) , or just right. You'll want to be anywhere between 0 and just under +1.
10. Change Shutter Speed first, then Aperture, then ISO! Having trouble getting your settings right? make changes in the order above. Shutter speed first, if your photos are too dark lower your shutter speed but make sure not to go below 1/100 for portraits especially of kids who aren't known for sitting still. If they're especially rambunctious your may even need 1/125. If your photos are too bright raise the shutter speed, as long as you're not getting under exposed you really can't go too high in shutter speed. Next change your aperture, if your photo is too dark you can make your aperture wider but remember, try not to go too much past 2.8 or you might not have enough depth of field to get the whole face in focus. If your photo is too bright make sure you try shutter speed first because changing your aperture will have an actual effect on how your photo looks aside from just making it darker. I wouldn't go above f-stop 5.2 for portraits. If all else fails change your ISO. Remember, the higher the ISO the less light you need but the more noise you get so go only as high as you have to. Typically, anything over 800 is going to be Very noisy. That's it, Snap away. If you have any questions, Feel free to ask in the comments and I'll do my best to answer you. And if this helped you please share us on Facebook, Pinterest, Twitter, or anywhere else
What is the Golden hour
The Golden hour is that magic time twice a day when we all look our absolute best in photos. Approximatly one hour after sunrise and one hour before sunset when the sun is low in the sky. What makes golden hour light so great?
What if I can't schedule my photos during golden hour!?
No worries. While the golden hour really is ideal its not always possible to take photos then. But there is something you can do to mitigate those middle of the day issues, find some open shade. Open shade is a large area of uniform shade. You can use shade from a tree but be careful for stippled light coming through the branches like in the photo below.
make sure to set the white balance on your camera to shade so that your photos don't come out too blue. You can get beautiful photos in open shade but try to occasionally get out there during the golden hour, you won't regret it.
Don't forget to enter the Contest to win a Mini Session on our Facebook page. There's only three more days to enter!! |
AuthorKarah Couch is a Maternity, Newborn, and Family photographer and mother of Seven year old twins and a rambunctious Four year old Archives
May 2022
Categories
All
|