
Of course there are some times when hiring a professional is really the best way to go, big milestones like a newborn shoot, birthdays, and what have you. But unless you're Beyonce you can't have a photographer with you every day, sometimes you're going to have to take them yourself. So, no matter what your skill level is, follow this list and you'll be sure to get great photos of your kids at home.
1. Get Outside if you can!!
you really can't beat good old natural light so get out there and take some shots. Its best to take photos outdoors during whats called The Golden Hour (one hour after sunrise and one before sunset) but other times of day are great too just try to be out of direct sunlight in the shade.
2. Step away from the FLASH!
Whether you're in low light inside or dark shade outside you're camera may want to use flash, do not do it! flash is ugly, it flattens the image and blows out detail. Take the photo below.
Doesn't look so good huh. She's overly bright, the background is overly dark, overall its just kinda bleh. Of course, there are times when flash is necessary and things you can do to make it look good like bounce it off of a reflective surface but if its the pop-up flash on your camera its probably going to look bad.
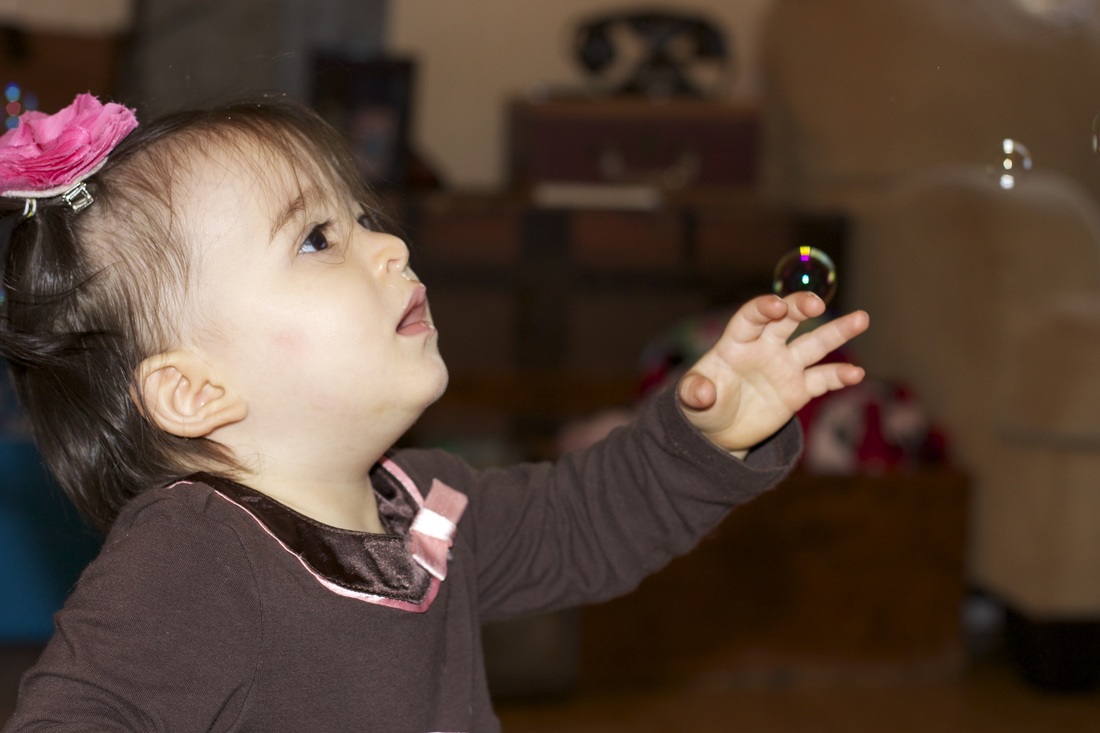
3. Shoot near a window!
So you can't go out side, no problem, shoot near a window you'll still get the benefit of natural light only indoors. set up with the Window in front of or beside your little one for good lighting on their face or with the window behind them for a nice silhouette effect
3. Shoot near a window!
So you can't go out side, no problem, shoot near a window you'll still get the benefit of natural light only indoors. set up with the Window in front of or beside your little one for good lighting on their face or with the window behind them for a nice silhouette effect

|

|
4. Know your Camera!
But won't my photos be too dark without the flash? And by the way, how do I turn the flash off anyway? No and I'm not sure, all cameras are different. So break out the manual or look up tutorials online and learn how to use your camera, how to change your settings, what all the abbreviations on it mean, how to turn your flash off, all that. You won't regret learning and you'll have some basic knowledge so the rest of this will be easy peasy.
5. Set your White Balance!
Your white balance is what tells your camera what color the light is where you're taking photos. Sure there's an auto setting on it but my experience is, your photos look better if you tell it where you are. Most cameras have AWB (auto white balance), Daylight (Bright Sunlight), Shade (pretty self explanatory), Cloudy, Flash (you're using a flash), White Fluorescent light, and Tungsten Bulb (a normal light bulb) Choose the one that matches the conditions you're in
6. ISO!
Set a low-ish ISO. The ISO is basically a standard of how sensitive your camera is going to be to light. The Higher the ISO the more sensitive it is to light meaning the photos will be brighter in lower light. That sounds great except that the higher the ISO the more noise. noise is how grainy an image will appear. So, the best course of action is to set the lowest ISO you can while still having enough light. How will you know how low you can go? read on!
From this point on I'm going to separate readers into two sections, Beginner and Experienced. If you're a beginner keep reading, if you're more advanced skip ahead to number 8.
7. Set your Camera to Aperture Priority Mode
when you take a photo with your camera a little diaphragm inside your lens opens and lets light in. Aperture or F-stop refers to how wide this diaphragm opens. Here's where it gets tricky; the lower the f-stop number, the wider the diaphragm is. Here's an illustration
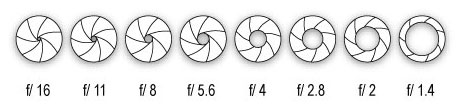
When the aperture is open wide your camera is able to take in the most light, it also shortens the depth of field meaning how much of the photo is in focus. When you're taking photos of people you'll usually only want them to be in focus and not the whole room so a short depth of field is a good thing. So, in aperture mode (usually represented by an A on the wheel on top of your camera) set your f-stop to somewhere around 2.8 or as low as your lens will go but not lower since it can be hard to get everything you want in focus any lower. Then, set your ISO to 200 if you're inside. Your camera will automatically set the shutter speed to go with your other settings. If the shutter speed in any lower than 1/125 move your ISO higher. Keep going until you reach an acceptable shutter speed. That's all! Snap away
Experienced Shooters:
8. Set your Camera to Manual!
In manual mode you'll have complete control over everything in your photo, it can be a little overwhelming at first but its the best way to get awesome pictures.
9. Set your aperture and shutter speed!
if you're not sure what an aperture is, read number 7 and come back. Shutter speed is how long your shutter or diaphragm stays open. a shorter shutter speed like 1/250 freezes the action and lets in less light, a longer shutter speed like 1/15 lets in more light and blurs the action. you'll want to find a balance between the two and your ISO and get exactly what you're looking for. Try a large aperture and short shutter speed for portraits like f 2.8 and 1/200. Depending on your lighting situation you may have to play around with that. if you have your aperture as wide as it goes and your shutter speed still has to be too low try raising your ISO.
You can see whether your settings are right without taking a photo. Either on the back of your camera or when you look through the viewfinder you'll see something like this
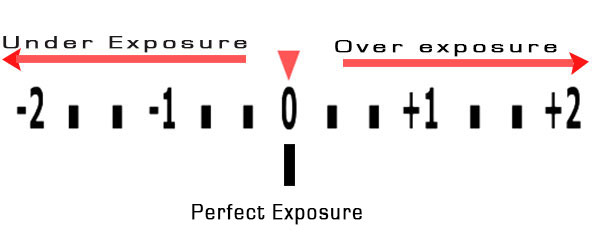
That little triangle will point to where your settings will put your photos on this graph. whether you're over exposed (too bright), under exposed (too dark) , or just right. You'll want to be anywhere between 0 and just under +1.
10. Change Shutter Speed first, then Aperture, then ISO!
Having trouble getting your settings right? make changes in the order above. Shutter speed first, if your photos are too dark lower your shutter speed but make sure not to go below 1/100 for portraits especially of kids who aren't known for sitting still. If they're especially rambunctious your may even need 1/125. If your photos are too bright raise the shutter speed, as long as you're not getting under exposed you really can't go too high in shutter speed. Next change your aperture, if your photo is too dark you can make your aperture wider but remember, try not to go too much past 2.8 or you might not have enough depth of field to get the whole face in focus. If your photo is too bright make sure you try shutter speed first because changing your aperture will have an actual effect on how your photo looks aside from just making it darker. I wouldn't go above f-stop 5.2 for portraits. If all else fails change your ISO. Remember, the higher the ISO the less light you need but the more noise you get so go only as high as you have to. Typically, anything over 800 is going to be Very noisy. That's it, Snap away.
If you have any questions, Feel free to ask in the comments and I'll do my best to answer you. And if this helped you please share us on Facebook, Pinterest, Twitter, or anywhere else
 RSS Feed